French Bread

Saturdays are my bread baking days. Whenever I’m cleaning, or doing laundry, or another chore I don’t enjoy, it’s nice to simultaneously have the wonderful yeasty smell of rising and baking bread in the kitchen. It cheers me up. 🙂
I also love to try new bread recipes. This is a french bread recipe I found on tasty kitchen. I originally planned to try King Arthur Flour’s french bread recipe, but this one just seemed so much simpler that it won out.
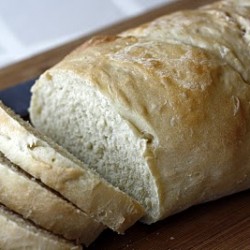
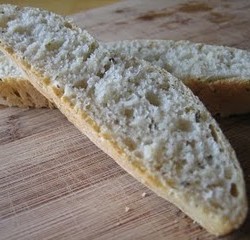
And it turned out great! So soft on the inside, with a perfectly brown crust. It was perfect to serve with the hamburger soup we had last weekend. I actually liked it so much I made it again this past weekend and served it with more soup!
Mike hasn’t told me his rating yet, but judging by the amount of bread he’s eaten over the past week, I’m pretty sure he liked it. 🙂
This French bread recipe is super simple to make and has a relatively short rising time, making it the perfect recipe for a busy weekend. I’ve used it for paninis, to serve with soup, and just to eat for lunch. It’s always a big hit in our family – you can’t go wrong with homemade bread!
If you’re new to bread-baking, this would be a good recipe to start with! Just make sure to add just enough flour so that the dough is no longer sticky. As long as you do that and follow the instructions, you’ll be fine! Enjoy!

*note on 1/16/10: I’ve updated the pictures on this post, and I had to write an update to say that I make this French bread recipe a lot. At least once a month. This has quickly become my go-to bread recipe because it’s so easy and so good. If you’re looking for a bread recipe with minimal mess, and that consistently turns out well, try this one. I definitely recommend it.
French Bread
Ingredients:
- 2-¼ cups Warm Water
- 2 Tablespoons Sugar
- 4-½ teaspoons Yeast
- 1 Tablespoon Salt
- 2 Tablespoons Vegetable Oil
- 6 cups Flour
Directions:
- In a large mixer, combine water and sugar and yeast. Allow it to soften/proof for about 5 minutes. Add salt, oil, and half the flour; mix well. Add remaining flour and mix well (I used the dough hook on my kitchenaid). Let it sit for about 10 minutes. Stir the dough down and allow to rest 10 more minutes. Repeat until dough has been stirred/rested 5 times.
- Turn dough out onto a floured surface. Knead lightly 2 or 3 times. Divide dough in half. Form each half into a long loaf and place on baking sheet sprayed with Pam. Cover and allow it to rise 30-60 minutes. With a sharp knife, cut 3 gashes at angle on top of dough. Spray top with water. Bake 400 degrees for 30 min, checking at about 20 minutes.
adapted from Tasty Kitchen


 Welcome! I'm Megan and it's my hope that here you'll find food that has been made with love and recipes that are shared with joy. Thanks for stopping by!


Learning to make bread is one of my kitchen goals. This looks easy enough to try! Looks like I'll have to set aside a Saturday to make this and put some stew in the crockpot. Perfect Michigan fall dinner!
AG – This is definitely a good recipe to try! Let me know how it turns out for you. 🙂
WOW! I wish i could bake. Thanks for visiting my blog.Nice to meet you..
I am in awe of anyone who makes their own bread.
How ironic I stopped by here. I just posted a beer bread recipe on my blog because it is starting to get a little bit chilly around here.
Great minds must think alike!
Nice bread…don't you like the smell of bread baking? Yummie 🙂
Oh this bread looks like it came out perfectlyI
its bad enough that telemarkets call during dinner, now i can't make the food without being bombarded by ads?
how do i put this website on the do not call list?
Actually, cutting the butter in like this makes it more homogenous. I think it is a great idea. I think I'll try it with biscuits. Then you don't have to use a pastry blender.
Sarah G
http://allourfingersinthepie.blogspot.com
Hmm, I don't know what happened here. I was answering a question on a different post about shredding hard butter with a grater. Oh well.
All Our Finger in the Pie – Thanks for the tip! I think you're right, and I think it's easier to do it that way as well. Cutting butter into little cubes might be one of the worst things about baking…
Do you think you could make this with white whole wheat?
Ella – I've never used white whole wheat flour, but I'm guessing that it would turn out fine. From what I understand, it acts more similarly to white flour than wheat flour. If you try it, let me know how it turns out!
Looks awesome! In your directions you say,
"Add salt, oil, and half the flour; mix well. Add remaining flour and mix well (I used the dough hook on my kitchenaid)."
Did you use the dough hook both times? Or the paddle the first time and then the dough hook the second?
Thanks!
merry vegetarian – I used the dough hook both times. The first time I made it I used the paddle the first time because it seemed so liquidy, but after that I used the dough hook to cut down on clean-up, and it worked well both ways. As long as it gets mixed, I think you're fine. Good luck! 🙂
Thank you for the recipe. I've never been brave enough to try to make bread. Finally got to use my dough hook! Came out perfect and was delicious!
Carrie – I'm so glad your bread turned out well! Thanks so much for taking the time to leave a comment and let me know you liked it. I love hearing about bread success stories!
Carrie – I'm so glad your bread turned out well! Thanks so much for taking the time to leave a comment and let me know you liked it. I love hearing about bread success stories!
Sarah and Terrell – The recipe is written for Active Dry Yeast. You can get that in the little packets or in a bulk container. Quick rise yeast is different and the bread will rise faster than if you use Active Dry yeast. You could definitely still use it, just watch your bread to make sure it doesn't rise too much. Good luck!
Do you think it would turn out right if I baked the bread in regular loaf pans? I'm a sucker for french bread and I'd love to make sandwich bread out of it.
Jake and Jenzi – I think it would be fine in loaf pans. You'd have to play around with the baking time, and it may not have quite the same texture, but I think it would be great! If you try it, be sure to let me know how it turns out!
awesome recipe! Bread turned out amazing: )
kristal – So glad this bread turned out well for you! Thanks so much for the comment 🙂
Megan!!!!! awesome bread just made it today to go with our white chili
amazing!!
I’m so glad you liked the bread! Thanks for commenting to let me know how it turned out. 🙂
I don’t exactly know what stir the dough down means. I don’t have a mixer so I do all mine by hand. Does it mean knead it a little and then let it rest? Thank you! You are always so helpful!
I’ve never kneaded this particular bread by hand, I would mix it thoroughly like it says in the instructions (it may be pretty sticky to knead, so good luck!). Then set it in a bowl to rise and every 10 minutes take a wooden spoon and kind of stir the dough around to deflate it. You could use your hands here too, just kind of punch it down and knead it lightly. Good luck!! I hope you like it, and let me know if you have any more questions. 🙂
Pingback: Italian Dunkers - your elementary school lunch, revamped!