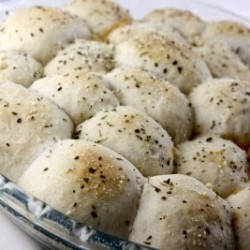
Perfect Homemade Pizza Crust

Remember in this post where I confessed that I used $.89 betty crocker pizza dough…and liked it? Well those days are no more. This post is all about my new favorite homemade pizza dough. I won’t tell you how many times we’ve eaten pizza in the last two weeks, I’ll only tell you that this is the best homemade pizza crust I’ve ever had. It’s thick and chewy on the inside, and crunchy on the outside – absolutely perfect texture-wise. And the taste is exactly what you’d expect from a great pizza crust. We’ve already tried it with our favorite margarita pizza, and with a new pizza that I’ll share with you soon. Both were absolutely delicious.
One of my favorite things about this dough is that you can make it in advance. I make it on the weekend, or on a free evening, then freeze it until I’m ready to use it. The day I want to make pizza for dinner, I just stick it in the refrigerator to thaw while I’m at work. After a quick 30 minute rest at room temperature, it’s ready to be rolled out and baked. Incredibly easy, and definitely worth it. Throw in the fact that I just got a pizza stone from Mike’s parents for my birthday, and homemade pizza is now a weekly staple in our house!


Perfect Homemade Pizza Crust
Ingredients:
½ cup warm water
2¼ tsp. instant yeast (or active dry)
4 cups (22 oz.) bread flour, plus more for dusting
1½ tsp. salt
1¼ cup water, at room temperature
2 tbsp. extra-virgin olive oil
Directions:
Measure the warm water into a 2-cup liquid measuring cup. Sprinkle the yeast over the top. If using active dry yeast, stir the yeast into the water and allow it to sit until bubbly, about 5-10 minutes. In the bowl of a stand mixer fitted with the paddle attachment, combine the bread flour and salt, mixing briefly to blend. Measure the room temperature water into the measuring cup with the yeast-water mixture. With the mixer on low speed, pour in the yeast-water mixture as well as the olive oil. Mix until a cohesive dough is formed. Switch to the dough hook. Knead on low speed until smooth and elastic, about 5 minutes. Transfer to a lightly oiled bowl, turning once to coat. Cover with plastic wrap and let rise until doubled in size, 1½-2 hours.
Press down the dough to deflate it. Transfer the dough to a lightly floured work surface. Divide the dough into two equal pieces. Form each piece of dough into a smooth, round ball.
If freezing the dough, wrap each ball of dough in plastic wrap, then place in a freezer bag and freeze. Place the dough in the refrigerator on the morning of the day you want to use it. (If using the dough for lunch, transfer to the refrigerator the night before.) Before making the pizza, take the dough out of the refrigerator and allow it to rest at room temperature for 30 minutes.
If using the dough right away (not freezing it), cover with a damp cloth. Let the dough relax for at least 10 minutes but no longer than 30 minutes.
To bake, preheat the oven and pizza stone to 500˚ F for at least 30 minutes. Transfer the dough to your shaping surface, lightly sprinkled with cornmeal. (a pizza peel or parchment paper) Shape the dough with lightly floured hands. Brush the outer edge lightly with olive oil. Top as desired. Bake until the crust is golden brown, and cheese is bubbling, 8-12 minutes.
from Annies Eats


 Welcome! I'm Megan and it's my hope that here you'll find food that has been made with love and recipes that are shared with joy. Thanks for stopping by!


That does look perfect – I love making my own dough!
That crust looks better than any I've had! I will have to try it.
I love your blog!
Any ideas of what you can do if you don't have a stand mixer?
It does look like the perfect crust! YUM!!!
Pizza crust is so hard to get right! I'm glad you found the perfect recipe 🙂
SurfLola – If you don't have a stand mixer, you can just knead the dough by hand. Mix it with a wooden spoon in a large bowl, then when it starts to come together turn it out onto a lightly floured surface and knead by hand for about 10 minutes, or until it's smooth and elastic. Then just continue with the rest of the recipe. Good luck! 🙂
SurfLola – If you don't have a stand mixer, you can just knead the dough by hand. Mix it with a wooden spoon in a large bowl, then when it starts to come together turn it out onto a lightly floured surface and knead by hand for about 10 minutes, or until it's smooth and elastic. Then just continue with the rest of the recipe. Good luck! 🙂
This looks awesome….I'm going to have to try it! I don't do the best making homemade pizza dough, but always up for the challenge of trying again!
We have been on a mission to make our own pizza dough…and have it turn out good! Will add this to our list of doughs to try. Your description of the texture sounds just perfect. I also like the fact that you can make it in advance and just have it around for when you get a pizza craving.
Wonderful looking pizza!
We both need a pizza stone! We've made our own crust before, but without a stone, we're missing that certain..je ne sais quoi. Thanks for sharing this recipe though. It'll be nice to try a new one.
Thank you for this! My boyfriend and I have been looking for the perfect vegan pizza crust and we can't wait to try this one out!
I passed an award on to you Megan, check out my post to see what it is!
http://jennsfoodjourney.blogspot.com/2010/07/there-once-was-lakediary-of-bad.html
I love that you can make this dough ahead to time — brilliant!!
I'm a new follower via Google Reader.
by the way… I'm a fellow Michigander 🙂
SnoWhite – Welcome! Thanks for taking the time to comment. It's always nice to "meet" someone else from Michigan 🙂
SnoWhite – Welcome! Thanks for taking the time to comment. It's always nice to “meet” someone else from Michigan 🙂
Love love your blog! What is the difference between bread flour and wheat or all purpose flour? Thanks so much!
Nicol – sorry for the slow reply, but here is a link to a site that talks about bread flour. http://www.ochef.com/97.htm
I think the main difference is that bread flour has a higher gluten content, which can give more rise or chewiness.
Nicol – sorry for the slow reply, but here is a link to a site that talks about bread flour. http://www.ochef.com/97.htm
I think the main difference is that bread flour has a higher gluten content, which can give more rise or chewiness.
I just finished mixing this now, and have it rising in the other room! Very excited to see how it turns out!
Followup: It was DELISH!!!! Thanks for posting!
Rob – So glad you liked this! 🙂
this is so very delicious!!!! I had been using another recipe and got bored. I love this 🙂 and my kids love it too. I'm wondering can you find whole wheat bread flour and use that? would you have to add more water?
ashleybrowning – glad you liked it! I've never heard of whole wheat bread flour, but if you can find it, I'd start with substituting it for half the flour and see how it goes.
I tried this with all purpose flour. it was good, but it wasn’t thick, which is totally my own fault! Next time I’ll get bread flour!
Glad you liked this, but sorry it didn’t turn out as thick as you hoped. Definitely try with bread flour. Also maybe try not rolling it out as thin next time? Stop back and let me know if it turns out any better if you think of it. 🙂
Pingback: Homemade Pizza — A Quick Weekend Meal « Simple Organized Living
I grind my wheat berries to make my bread, pizza crust, etc. Bread flour (as I understand it) has extra wheat gluten added to it. I’ve never heard of whole wheat bread flour available in the store. I would think that you could just use whole wheat flour and add a little wheat gluten (available in the grocery store near the flour) to it. I”m going to be trying this recipe and that’s what I’m going to try.
Thanks for the informational comment! I’ll be interested to hear how it turns out with your modifications. 🙂
I just discovered your site and am so excited to try your recipes, they all look great! I’m ALWAYS looking for great pizza crust recipes and this one looks fabulous, I can’t wait to try. One question for you, it may be a common sense question but I thought I’d ask anyway…do you bake the pizza on the parchment paper or transfer it from the parchment paper to the stone? Thanks!
I bake it on the parchment paper. I transfer the whole thing, parchment paper included, to the pizza stone. I tried to do it without the parchment paper once and it was a mess, but I know other people do it that way. So do whatever seems easiest to you. 🙂
Have you ever thought about adding a little bit more than just your articles?
I mean, what you say is valuable and everything.
However just imagine if you added some great visuals or videos
to give your posts more, “pop”! Your content is excellent but with images and video clips, this site could certainly be
one of the very best in its niche. Very good blog!
If Sony erases features like free-to-play online or game chat, then it’ll cause many video game players
to remain angry. Specially without having the actual specifics, in many cases
the PEOPLE granted minute card, these great
providers may be inaccessible for you. You may also look into
some psn charge cards weblogs exactly where
you’ll be able to find some great info pertaining to how to download free psn rules online.
Pingback: Recipe - Roasted Vegetable Stromboli - Donna Coulling
Pingback: Homemade Pizza -- A Quick Weekend Meal - Andrea Dekker
I love your blog and so many of your recipes but this is hands down my most used recipe ever! There’s always at least one I my freezer and I
Keep it replenished always! Thank you!!
I was confused by the line “Measure the room temperature water into the measuring cup with the yeast-water mixture” which I thought meant until the *total* is 1-1/4 cups (not add 1-1/4 cup to the 1/2 cup) so we kept adding water until it seemed at least better.