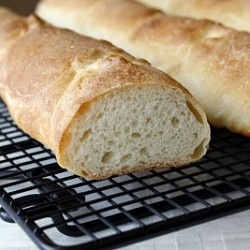
French Baguettes

For my French Dinner Party, I knew I needed some authentic tasting French bread. I have a very simple French bread recipe that I tend to fall back on, but for this occasion, I knew I needed something a little more “real.” Enter King Arthur Flour – my go-to place for all things bread.
I’ve looked at their baguette recipe before, but I’ve always written it off as too complicated, or too time-consuming. But since I was going all-out for the meal anyway, really, what’s an extra complicated recipe or two?

It really wasn’t as difficult as I expected. There is an exceptionally long rising time (3 hours, plus another 1.5 hours!), but other than that, the recipe was pretty simple. According to KAF, the long rising time is what gives it that traditional French bread flavor. It must have worked because these loaves were incredible.
They don’t quite have the classic baguette shape I was going for – I need to work a little on my shaping skills. Disregarding their looks, however, these loaves were perfect. They had a great chewy crust, with a light “holey” interior. I probably could have baked them a little longer, but I was nervous about overbaking them, and, to be truthful, I needed the oven for the boeuf bourguignon.

Mike rated these a 4.75, another very high score (unfortunately he seems to give the more “complicated” recipes higher ratings). Our guests seemed seemed to really enjoy these as well. I’ve come to the conclusion that these baguettes are worth the work and I’m already planning when I can make them again.

French Baguettes
Yield: Yield: Three 16" baguettes.
Ingredients:
Starter:
1/2 cup cool water
1/16 teaspoon active dry yeast or instant yeast
1 cup King Arthur Unbleached Bread Flour
Dough:
1 teaspoon active dry yeast or instant yeast
1 cup to 1 1/4 cups lukewarm water*
all of the starter
3 1/2 cups King Arthur Unbleached Bread Flour
1 1/2 teaspoons salt
Directions:
*Use the lesser amount in summer (or in a humid environment), the greater amount in winter (or in a dry climate), and somewhere in between the rest of the year, or if your house is climate controlled.
1) Make the starter by mixing the yeast with the water (no need to do this if you're using instant yeast), then mixing in the flour to make a soft dough. Cover with a damp towel and let rest at room temperature for about 14 hours; overnight works well. The starter should have risen and become bubbly.
2) If you're using active dry yeast, mix it with the water, then combine with the starter, flour, and salt. If you're using instant yeast, there's no need to combine it with the water first. Mix and knead everything together—by hand, mixer or bread machine set on the dough cycle—till you've made a soft, somewhat smooth dough; it should be cohesive, but the surface will still be a bit rough. Knead for about 5 minutes on speed 2 of a stand mixer
3) Place the dough in a lightly greased medium-size bowl, cover the bowl, and let the dough rise for 3 hours, gently deflating it and turning it over after 1 hour, and then again after 2 hours.
4) Turn the dough out onto a lightly greased work surface. Divide it into three equal pieces.
5) Shape each piece into a rough, slightly flattened oval, cover with greased plastic wrap, and let them rest for 15 minutes. This relaxes the gluten to make it easier to work with.
6) Working with one piece of dough at a time, fold the dough in half lengthwise, and seal the edges with the heel of your hand. Flatten it slightly, and fold and seal again. (step by step pictures can be found here)
7) With the seam-side down, cup your fingers and gently roll the dough into a 15" log. Place the logs seam-side down onto a lightly greased or parchment-lined sheet pan or pans.
8) Cover them with a cover or lightly greased plastic wrap, and allow the loaves to rise till they've become very puffy, about 1 1/2 hours.
9) Towards the end of the rising time, preheat your oven to 450°F; if you're using a baking stone, place it on the lowest rack.
10) Using a very sharp knife held at about a 45° angle, make three 8" vertical slashes in each baguette. Spritz the baguettes heavily with warm water; this will help them develop a crackly-crisp crust.
11) Bake the baguettes until they're a very deep golden brown, 25 to 30 minutes. Remove them from the oven and cool on a rack. Or, for the very crispiest baguettes, turn off the oven, crack it open about 2", and allow the baguettes to cool in the oven.
from King Arthur Flour

 Welcome! I'm Megan and it's my hope that here you'll find food that has been made with love and recipes that are shared with joy. Thanks for stopping by!


Those are beautiful! Still never made any bread…
Wow!! I am so so impressed with your loaves! You really inspiring me to start venturing into more serious bread making. Thanks!!
wow! nice job! they look beautiful!
Leave it to a man to give the best ratings to the most complicated recipes! 😉
They look delicious!
Love the new header:) the bread looks perfect too!
This looks great!!! I like the header ALOT! Great job! It is a keeper.
I like the baguette recipe! Great pictures!
Jessica – bread is not nearly as intimidating as it seems. Start with the easy french bread recipe (linked in the post above) or english muffin bread – both are hard to mess up! The end result is so worth it 🙂
Maria, Noelle – so glad you like the header! My cousin designed it for me 🙂
My boyfriend and I have only tried "easy no-knead" bread recipes, but I think it's time we expanded our horizons…this looks like a great recipe.
I love fresh baked bread.
Those are gorgeous and I'll be waiting for my shipment fresh from your kitchen haha!
You go girl!! Baking your own bread is awesome!
I always buy the pilsburry pop open french bread lol!
This looks delicious!
I've always wanted to make baguettes! Now I have a great recipe, I should really try it. Thanks for sharing!
Nice! Got to make make bread for this weekend- this is it!
Wow, nice French baguettes…love the pictures 🙂
cant wait to try it
Megan, good for you for taking the baguette leap. Once you get into it, they really aren't all that hard, are they? Your breads are beautiful, and the rest of the dinner sounds delish as well. Kudos!
Happy baking.
~ MaryJane, King Arthur Baker/Blogger
OH, totally making these. Man, I love you. 🙂
These look beautiful! I love having a nice piece of a baguette with some soup or a salad.
MaryJane – I'm so honored that someone from KAF would comment on my blog! Thanks for a great recipe. I'm planning on making them again this weekend, but the stuffed version – yum!
Wow! Good for you! I used to make a lot of bread, but just don't seem to get around to it anymore. I am so impressed with your efforts. Must admit I do love King Arthur flour!
wow those look SO GOOD! I will have to make them some time 🙂
So jealous of how these came out. I suck at bread making. I plan on mastering it this summer though!
I made these tonight. So good! However, mine seem to be much skinnier than yours are–I don't know why, but I don't really care how skinny they are because they were fabulous! LOVED Them. For the win!
Anna I'm so glad the baguettes turned out well!! Thanks so much for stopping back to let me know! Don't you just love homemade bread?? 🙂