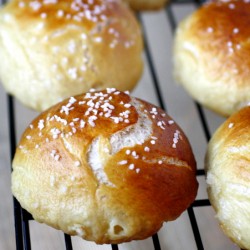
Soft Dinner Rolls
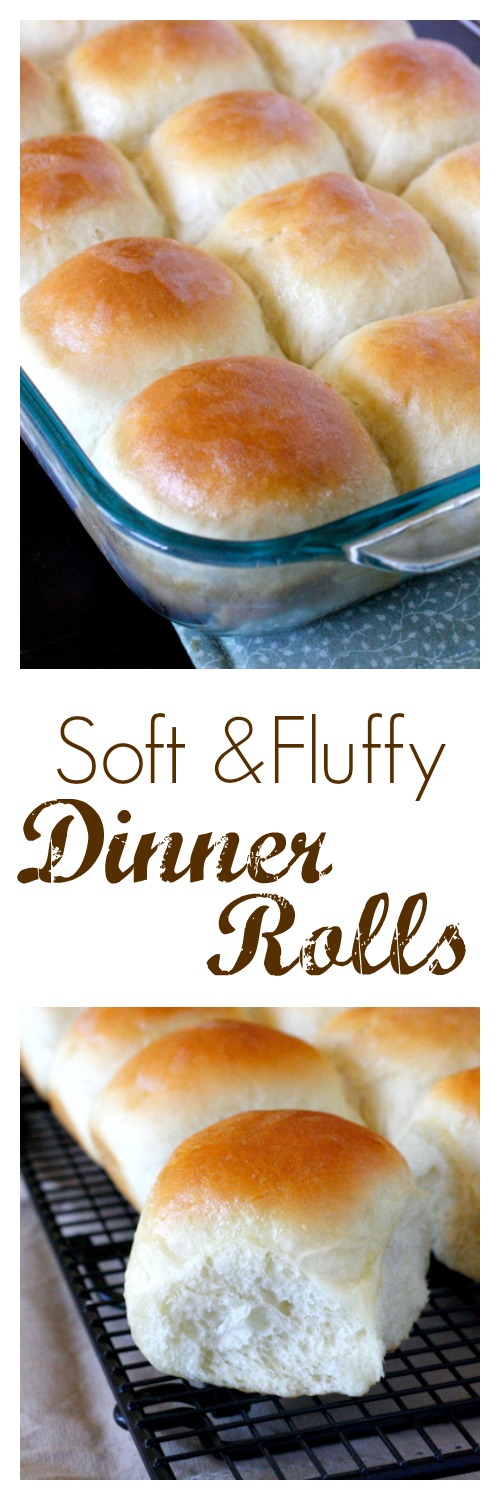
These homemade dinner rolls are soft and fluffy and perfect for family dinners or holidays!
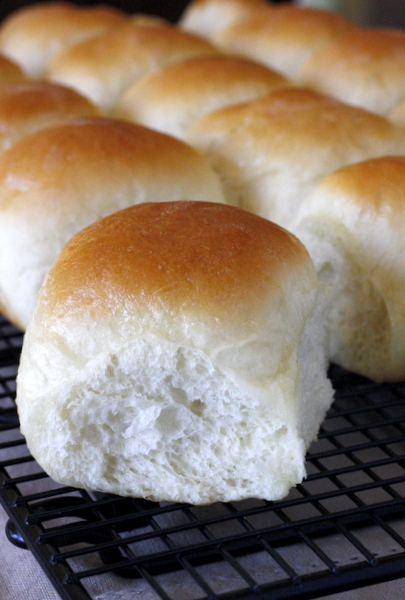

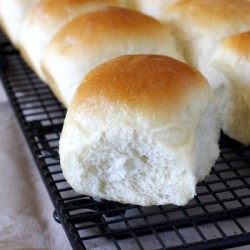
I have been looking for a good homemade dinner roll recipe for awhile now, and I’ve finally found one that I love! I’m so excited to share it with you because I am guessing you are going to love these rolls as much as we do. 🙂 They turned out so soft and fluffy – exactly what I was looking for in a dinner roll.
I am often in charge of rolls when it comes to family dinners and holidays, and this has become my go-to recipe! I have made these rolls for countless occasions and they are a big hit every time. I love that there is a make-ahead option – a definite must for busy holidays!
The rolls are simple to make, and they freeze beautifully. Often I will make them a few days in advance, freeze them once they are baked, and pull them out of the freezer when I need them. You can even form the dough into rolls and freeze before baking – just like your own homemade version of those popular Rhodes rolls! (Side note: I grew up eating Rhodes rolls for every holiday, and as much as I love them, I promise you that these taste better!)
If you’re new to bread baking, don’t be intimated. Just follow the instructions as written you will be fine! The key is to add just enough flour to achieve a soft dough that is only slightly sticky. I guarantee you will feel like a rock star in the kitchen when you pull these fluffy rolls out of your oven!
This recipe is perfect for all the holiday events coming up – I’ve already made a few batches, and I know I’ll be making a few more of them in the coming months. 🙂
See this link for comments from bakers who tried and LOVED this recipe on Pinterest!
Looking for dinner recipes to pair these soft dinner rolls with? You can’t go wrong with Slow Cooker Mediterranean Pork, Slow Cooked Puerto Rican Pulled Pork, or Orecchiette with Mini Chicken Meatballs!
Soft Dinner Rolls
Yield: Makes 30 rolls
These homemade dinner rolls are soft and fluffy and perfect for family dinners or holidays!
Ingredients:
- 2 cups warm milk
- 2 Tbsp active dry yeast
- 1/4 cup granulated sugar
- 2 tsp salt
- 6 Tbsp salted butter, softened
- 2 large eggs
- 6 cups all-purpose flour
- 1 Tbsp salted butter, melted (for brushing)
Directions:
- Combine the milk, sugar and yeast in the bowl of a stand mixer. Let sit for 5 minutes or until the mixture begins to foam. Add in the salt, butter, eggs, and 5 1/2 cups of flour. Mix with the dough hook on low speed until well combined. Add the remaining half cup of flour. Change to medium speed and knead until the dough begins to pull away from the side of the bowl, approximately 4 to 5 minutes. The dough mixture should be slightly sticky and soft.
- Transfer the dough to a lightly greased mixing bowl. Cover with a towel and let rise 90 minutes, or until doubled in size.
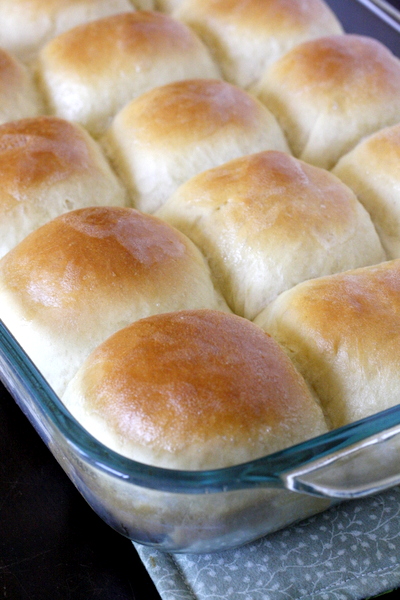
- Lightly grease two 9x13 pans. Punch down the dough and form into 30 rolls. Place into prepared pans, making five rows of three in each pan. Cover and let rise 1 hour.
- Preheat oven to 375 degrees. Bake the rolls for 12 to 14 minutes, until lightly browned on top and cooked through. Remove rolls from oven and brush with melted butter. Serve the rolls warm, or to cool, let rest on the pan for 15 minutes before transferring to a wire cooling rack. Once cooled completely, store in a plastic bag.
*Note: To freeze unbaked rolls, follow the recipe up through shaping the rolls. Place the rolls immediately into the freezer. Once frozen, transfer them to a freezer bag until you're ready to use them. To bake, place frozen rolls in a greased pan, cover and let thaw and rise,about 5 hours depending on the warmth of your kitchen. Bake as instructed above.

 Welcome! I'm Megan and it's my hope that here you'll find food that has been made with love and recipes that are shared with joy. Thanks for stopping by!


I’m making a ton of rolls for this weekend, so I may try this recipe! If I make them and freeze them, do I let them thaw first, and then bake as usual, or bake while frozen and cook for longer? Or would it be better to bake them and then freeze them, then use the oven to just warm them up?
This was my first attempt at yeast rolls. luckily my husband bakes bread a lot otherwise I would not have known to sprinkle additional floor on the dough when beating it down, as it was very sticky. Great recipe though.
Did you figure out how to bake after freezing?
Great recipe 🙂 My family all liked it. I halved it, which was easy (Thank you). However, if someone somehow manages to read the whole recipe and *not see* the little part about letting the rolls rise a second time, until about 30 minutes before it’s time to eat I had to set the oven to about 175 for five minutes with the rolls and then turn it off, and it saved them I hate it when I read the whole recipe and then find out I missed part of it I’m making them again tonight, and this time I know anyway they actually taste good enough to entirely skip adding extra butter
I don’t have a stand mixer i can do it by hand.
Can the the initial, part be done in a bread machine? If so at what stage do you shape?
So easy and tasty bread rolls. I filled some rolls with dark brown chocolate, kids loved it.
Thank you for this great recipe.
Yes- easy to mix with a wooden spoon!
You can mix with a wooden spoon if you don’t have a mixer!
Made these today so I could freeze for Thanksgiving in a couple days. Found I needed to add more flour, just too sticky. Baked at 375 one in glass pan, one in aluminum pan for the 14 minutes. Glass pan got nice and brown. The aluminum was on the rack below and did not get brown. So, I continued baking the aluminum at least 8 minutes more. Thought the glass pan was cooked, not so lucky, after letting it sit for 15 minutes, discovered still doughy, real doughy. So I would say, cook longer than 14 minutes. I have an electric oven and checked the heat, and it was fine.
Looks so yummy!
Is 2 TBLS yeast correct?
Seems like alot
Seriously you guys! These are hands down the best rolls I’ve ever had! I made the roadhouse restaurant version and they don’t compare to these. I’ll be sharing this recipe with everyone! Absolutely happy! Thanks for sharing!
Going to try these for our dinner tonight!
I would love to try this recipe! Can you pls tell me at wich stage I can freeze them?
Hi! I want to try this recipe to and i am just wondering at which stage i can freeze them! What did you do?
@Maria Estay you can freeze them after your form them into rolls but before you let them rise the second time.
I made these today. The only thing I did differently was to use bread flour. Man oh man were they delightful. I’ve been experimented my with different rolls to take as my part of Christmas Eve dinner this year. This one is perfect. They are light and airy so you can slather on the butter and just enjoy. However, they are tall and sturdy enough to slice into in order to lay on a little ham or turkey for petite sandwiches. Perfection!!
Can I make these without a KitchenAid? I’m in the process of buying one but money is very scarce for me right now. I would LOVE to make homemade dinner rolls, since I’m into homemade foods and not processed. Please help me out
This recipe can be made with a spoon to mix ingredients and then knead dough by hand. Enjoy!! My dough is riding as I type this.
You can just knead the dough by hand.
I’m try this today. I’m babysitting my 2 grandchildren whom I love so much. Love this because you can mix ingredients with spoon and knead by hand. Thanks for sharing. Merry Christmas. Tina from Hawaii.
Cam this recipe be used for making bread as I did make buns and they were delicious. So just wondering if I could use to make a couple loaves of bread? Thanks you
I’m in the process of making these rolls. Does anyone know approx. how many oz. these rolls should be? Directions read to bake for 12 to 14 minutes but what size do they need to be? Thank you.
Mine ended being about 1.75oz a piece.
These were delicious! Texture, shape and taste were all very good but the color, unfortunately, was lighter than butter! Any suggestions?? Thanks!
I finally made these rolls. They are amazing! The texture is great. The only thing is the color. I let them stay in for five minutes and it turned a little darker. The butter was only slightly lighter. Still great rolls.
How much dough is needed for each roll if it makes 30?
Do you know the nutrition information for these rolls? Really good, by the way!
This recipe was perfect. I did the kneading in my bread machine. I was really skeptical about how they would turn out because the dough seemed really dense itself, but they turned out so light and airy, literally perfect.
One tip is make sure your dough is in a big enough bowl because I wasn’t prepared for the dough to rise and basically triple it’s size.
These were perfection. I’ve always struggled with yeast breads but I found succes with this recipe. As one of the ladies above, I used bread flour. I have a gas oven (which seems a bit on the cool side) so I had to bake a bit longer.
This was my first “bread” baking I have ever done, as the idea of using yeast made me nervous because I didn’t want to screw it up. WELL, I am on my second batch in a week and I love them and so does everyone else i brag up my first rolls too! Thank you!
Pingback: 21 Thanksgiving Side Dishes - Lolly Jane
Thanks Megan for this receipt, it’s easy and yummy I put cheese and ham in this bread too
Pingback: 200 Best Thanksgiving Recipes for Side Dishes - Prudent Penny Pincher
Have been making these for like 30 years, came from a Bread Receipes book. It is fantastic. A soft dough. I combine flours, oatmeal, whole wheat, gluten, white. If using whole wheat need the gluten for being fluffy and not hard. I keep the white to 50% and the play around with the others to come up with the total amount of flour. Also, do NOT try to double!!! It makes to much for mixer and the mess and clean up is horrible. Make two separate batches. Always had to make two batches because they went so fast. Enjoy.
Hey, forgot! These are great to warm up later. Put in microwave for about 15 seconds. Warm, moist, not dense and chewy like most microwave reheated bread.
You must thaw them – allow them to raise before you can bake them .. just like the frozen Rhodes buns
After shaping place on sheet and freeze. Once frozen transfer to bag until ready to use them.
Those asking about freezing, this note is added at the end of the recipe.
To freeze unbaked rolls, follow the recipe up through shaping the rolls. Place the rolls immediately into the freezer. Once frozen, transfer them to a freezer bag until you’re ready to use them. To bake, place frozen rolls in a greased pan, cover and let thaw and rise,about 5 hours depending on the warmth of your kitchen. Bake as instructed above.
I made it with just my hands multiple times and they were great. Whole wheat flour and regular on many occasions!
Glad you liked them! 🙂
Pingback: 250 Best Christmas Dinner Recipes - Prudent Penny Pincher
What temperature should the milk be before adding the yeast?
I think I read somewhere that milk should be 105-110 degrees, but I never actually check the temperature. I just heat it until it feels warm, but not hot.
Best rolls ever couldn’t stop eating them
Ha! Same here.
Just made these for Christmas , they turned out beautiful!
Glad you enjoyed them, Sharon!
I thought the same thing. I had 2 packets of yeast on hand and just used them both and they turned out fine.
Can you tell us weight of “6 cups all-purpose flour”?
According to King Arthur Flour a cup of all-purpose flour is 4.25 oz
Pingback: The Best Easter Recipes - Smart School House
When You say shape into rolls exactly what do you mean..roll into balls ,form them into squares?? Pics would be helpful.ThankYou
I normally just roll them into balls. Next time I make them I’ll try to remember to take pictures!
Pingback: Homemade Vegan Buns aka Rolls – Organic Ella
Um…I’m mathematically challenged…severely. So, when you say 5 rows of 3…do you mean that there are 3 rolls on one across-row and there are 5 rows down? Sorry. I’m envisioning this and cannot see only 3 roll balls on each row of 5. That’s a lot of room between rolls. Please, could you email me? Thank you!
Yes that’s exactly what I mean. 🙂 3 rolls across, 5 rolls down. Your pan might be bigger than the one I used (9×13) if you can fit more rolls across. If you look through the pictures in the post you will be able to see a picture of them in the pan to get a better idea. Hope you like them! 🙂
Hello I would like to try this recipe but I’m wondering if the temperature is in Fahrenheit or Celsius?
Fahrenheit
Wow! These rolls are fabulous!
I didn’t have regular fat milk and didn’t want to use skim milk so I substituted coconut milk- perfect!
Also mixed this dough by wooden spoon and kneaded by hand and dough was still great!
This is got to be my favorite roll recipe ever!
Thanks Megan for sharing this recipe! Can’t quit eating them.
Coconut milk- what a good idea! And glad to know they turn out great kneading by hand. Thanks for letting me know!
Hi, I just found this recipe. I was searing for a soft roll receipe, just like K&W has! If anyone has ever heard of K&W or K&S, will know they have some delicious soft rolls! I wanted to try to duplice their roll. Can anyone please tell me, who has tried this and also had K&W (or K&S) soft rolls, DOES THIS TASTE LIKE THEIRS? I hope so. Thank you so much. Beth
I’m sorry, I’ve never heard of K&W – hopefully someone else can help you out!
This recipe was spot on. Made it just as written and it was super simple and the rolls were amazing.can’t wait for leftover turkey sandwiches made in the rolls tomorrow. This recipe is my new go to roll recipe
Oops! I see I can’t type! So, I’m correcting my typos here. I do not have spell check! Searching. Recipe. Duplicate. LOL
Roll them into balls. Put 3 across and 5 down in the pan, for a total of 15. When left to rise again for an hour, they will puff up and look squarish. They will run into each other and when baked look just like the picture! I had to knead these by hand, but they were my very first try at raised rolls and they turned out great!
I’m so glad you liked them and they turned out well for you!
Made this for the first time and I must say I was pleased with the results! However leaving the rolls to rise for the second time left me really impatient I must say. This is a good recipe but I wish it just ddn’t have a lot of prep time.
Glad you like these rolls! It is a lot of prep time, but homemade bread is so worth it. 🙂
Your comment just saved me $275 lol. Thank you.
If I make these the day before, how can I re hear them the next day? Pop them back in the oven? If so, for how long and what temperature?
A gentleman a couple of comments above mentioned a quick 15 second reheat in the microwave works well.
There’s way too much yeast in this recipe. It should only need 2 1/4 TSP of yeast. My bread ended up tasting like it was over proofed
I’m sorry to hear they didn’t turn out well for you. I haven’t had that problem…I’m wondering if maybe the dough rose for too long?
Turned out pretty but had no taste except yeast.
I haven’t made them yet, but I would think one package of yeast would be sufficient.
I made these today! They look soo pretty! They smelled wonderful!
Can I use instant dry yeast ?